
You may have a spreadsheet with Contact information that you would like to import into IQ. You can either import the Contact information only or create both Contact and Message.
|
Important Note: |
|
To import spreadsheet information into IQ, it must be in one of the following formats: •Comma Delimited (CSV) •Tab Delimited •Quote Delimited •Bar Delimited Most often, you will be using an Excel spreadsheet - you will need to convert the data in the Excel spreadsheet to one of these formats. To do so, use the "Save As" option in Excel, and select one of the file types from the list. The file you save will be the one you will use to import.
|
Once you have saved your file as one of the possible .txt file types, you are able to import the contents into IQ.
1.Open the Contacts Big Menu, and select Import from the New column.
2.Enter a meaningful name in the Set Name field. IQ automatically selects Import for the Set Type.
3.Click the Configure Set button. IQ displays the Edit Definition dialog with the Set Name and Source populated.
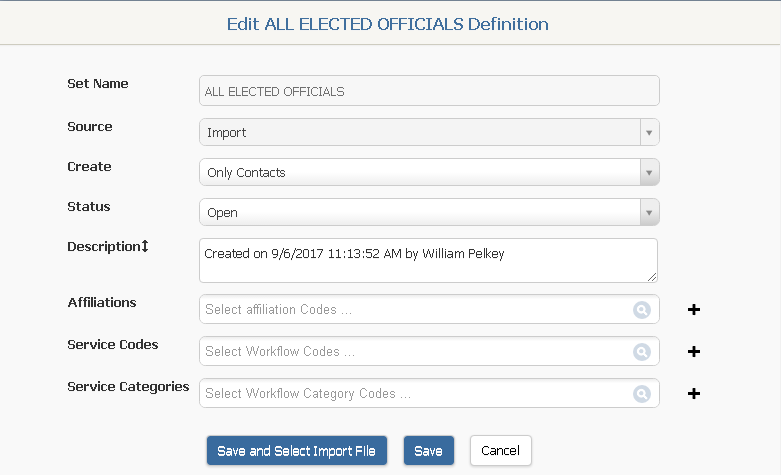
4.The Create field defaults to Only Contacts. Select Contacts and Messages if you would like IQ to create a Contact and a Message record for each imported record. Select Contacts and Outreach if you want to create Contact records and a single Outreach Message record for all of the imported Contacts. 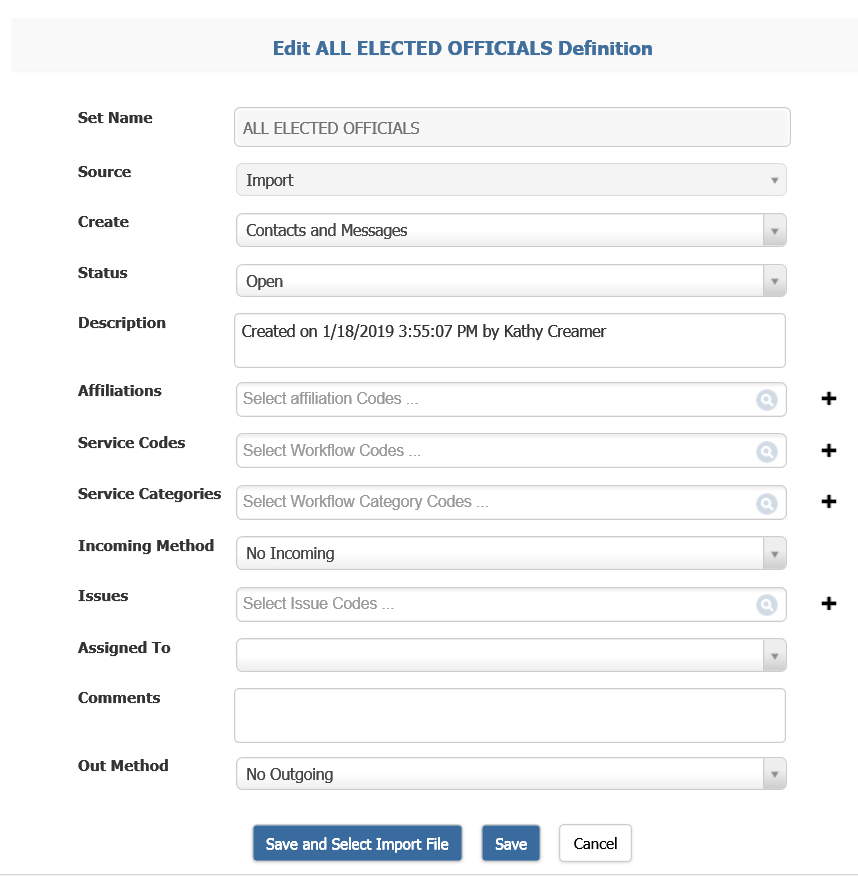
5.Use the Affiliations field to automatically attach Affiliation Codes to all imported Contact records.
6.Use the Service Codes or Service Categories field to automatically assign Service Codes or Categories to all imported Contact records. This will make ALL imported Contact records Agency Contacts for Casework or other types of Services, therefore, this field should only be populated if all Contacts in the spreadsheet work for an agency and act as liaisons in assisting with Service-related issues.
7.The Incoming Method will default to the method selected in your IQ User Preferences. You may select another method if needed.
8.Use the Issues field to automatically attach Issue Codes to all Message records created by the Import process.
9.If you would like to assign the Message records to another IQ user, select that User in the Assigned To field.
10.Add any Comments that you would to be recorded in the Comments field for the Message record(s) created.
11.The Outgoing Method defaults to No Outgoing. Select an Outgoing Method if you would like to select a letter which will be added to each Message record.
12.Click the Save and Select Import File button. IQ displays the Import File dialog.
Once you have configured the information you would like to apply to all incoming Contact and/or Message records, you will locate the .txt or .csv file you created to import.
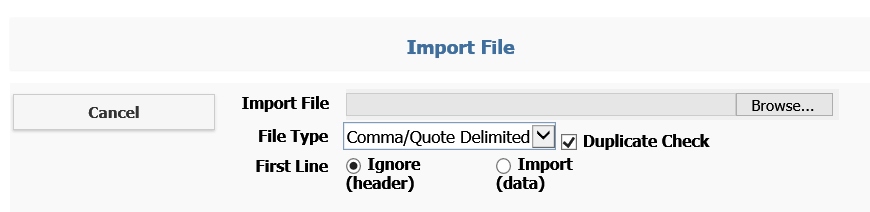
1.From the Import File dialog, click the Browse button to locate the .txt or .csv file you created.
2.Be sure that the File Type matches the type of file you are importing.
3.If your .txt or .csv file has a header row, you can select the option to Ignore (header). If not, you can use the option to Import (data).
4.The Duplicate Check option is checked by default, so that IQ searches for a possible matching Contact record and updates it before creating a new Contact record. If you uncheck the Duplicate Check, IQ will create a new Contact record for each imported record, which may result in duplicate records in your database.
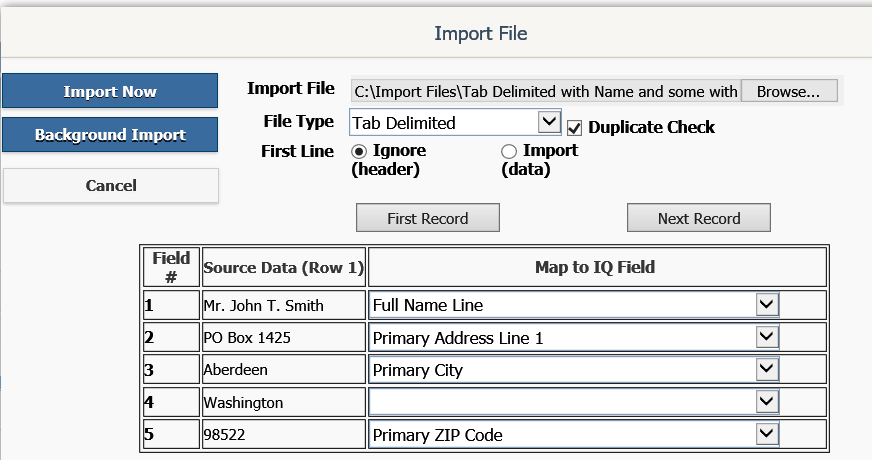
5.Use the First Record button to view the data from the file and select or confirm the IQ fields in the Map to IQ Field column.
6.Use the Next Record button as many times as you need to verify all entries will appear in IQ appropriately.
7.When you are ready, you can use the Import Now button to start the import. If you have a large list and would like to schedule a background job to import data, use the Background Import option.
8.IQ will display information on the progress of the import process. When the import is finished, you can use the Return button to view the results.
Create a .txt or .csv File from an Excel Spreadsheet
To create a .txt or .csv file from an Excel Spreadsheet, you must first modify the spreadsheet to allow for easy uploading. To do this, you will have to make sure that all of the field information you want to upload is included in separate columns in the spreadsheet. The exception to this is a Full Name field. You can enter a prefix, first, middle, and last name in a single cell in a spreadsheet, and IQ will parse that information correctly upon import.
Address fields must be created as separate columns in the spreadsheet to import correctly into IQ.
1.Open the Excel Spreadsheet. Verify the data you are about to import is correctly separated into appropriate columns in the spreadsheet. Also, check your data to be sure you are importing all good data. It is easier to delete unwanted data from an Excel spreadsheet than it is to manage unwanted data in IQ.
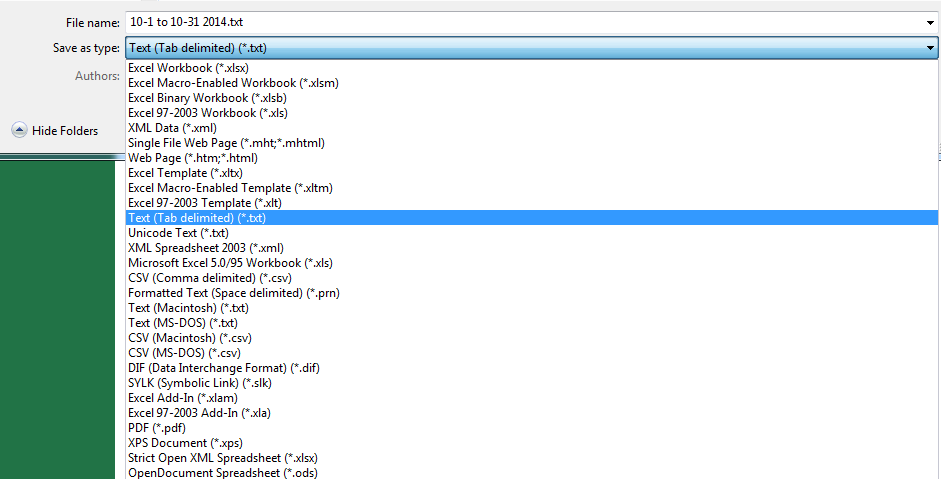
2.Once you have opened your Excel spreadsheet, use File/Save As option to save your spreadsheet as a .txt or .csv file. You can use one of the following:
•Text (Tab Delimited) - .txt
•CSV (Comma Delimited) - .csv
3.Name and save the file to your workstation or shared drive.
Copyright © 2020 Leidos Digital Solutions, Inc (DSI)