
Create a Survey
You can create Surveys to include in eNewsletters or other targeted emails. Survey results are recorded in the Survey record and can be reviewed in the Form Letter or eNewsletter in which the survey is included as well as in each Contact record.
Surveys can be embedded in the body of an eNewsletter, or can be accessed by clicking on an image of the survey in an eNewsletter. They can also be included as a link in the content of an eNewsletter.
Set Up Survey
1.In the Outreach menu, select Survey in the New column. (IQ displays the Survey record in the Setup step).
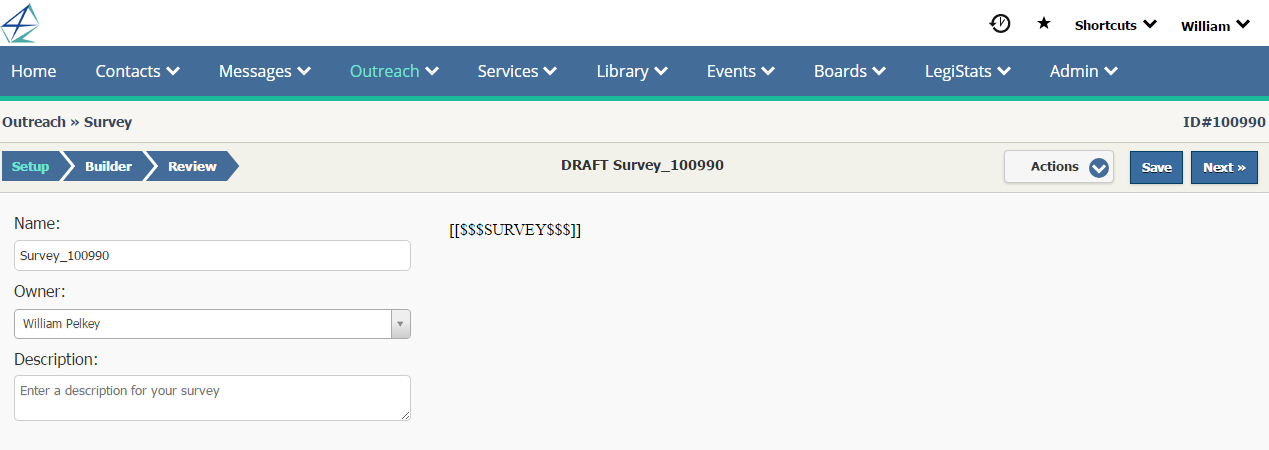
2.The Name field defaults to Survey_####. You can remove it and enter a more meaningful name.
3.Enter a description for your survey if you like.
4.Use the Save button or click the Builder tab OR Select Next to move to the next step.
Enter Questions and Answers
5.Select the type of question you would like to create. Checkboxes allow multiple values to be selected, while Radio Buttons and Dropdowns allow only single values.
6.Enter the question, and each answer you would like to include. If you select an Affiliation Code(s) to associate with one or more answer, that Affiliation Code(s) will be applied to or removed from the Contact record when the survey is submitted.
.png)
7. Add as many answers as you need using the Add Another Answer link.
8.Select the Required checkbox if you would like the question to be required in order to submit the survey.
.png)
9.Lower/Upper Limit options are available if you selected Checkbox questions. Upper and lower limits can be defined for choices, allowing for something along the lines of select the three most important (1-3 answers are allowed). NOTE: If a question is marked as required and lower/upper limits are not populated, at least one response is required. Also, for questions that allow an "other" response (configured below the standard answers) that answer is only counted to the totals IF the respondent supplies a value in the text box. When "other" is checked, but no value is entered, that answer is ignored.
10.If you would like to include an Other option, check the box and enter that option.
11.You can also change the way your answers are displayed using the link.
12.Select Save when you are finished with the question and answers.
Set Survey Cosmetics
13.On the left side of the Survey Builder page, in the Theme section, use the drop-down menus to select font type, color and size for the questions and answers. You can also select the Background Color for the survey and determine which Separator you would like to use between questions.
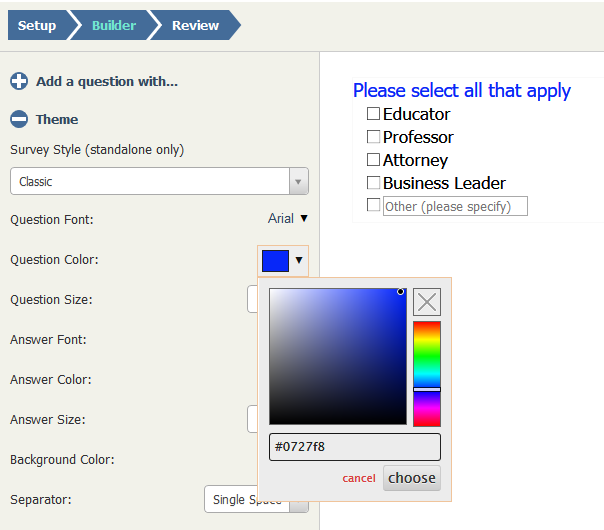
14.Click the Review tab or the Next button to continue to the next step.
Review and Publish Survey
15.Select the Display you would like to use for the survey:
•"Embed this survey in the e-mail (if possible)" will allow recipients to complete and submit the Survey directly in the email itself, IF the recipient's email client allows embeded content. For email clients which do not, the Survey will open in a new browser window.
•"Show a link in the e-mail that opens the survey in a new window" will allow the recipient to click a hyperlink to open the survey.
•"Show an image of the survey that opens the survey in a new window" will display the survey in the body of the email as an image. Clicking on the survey image will launch the survey in a new window.
•"Show a custom image of the survey that opens the survey in a new window" will display the survey in the body of the email as a custom image that you provide. Clicking on the survey image will launch the survey in a new window.
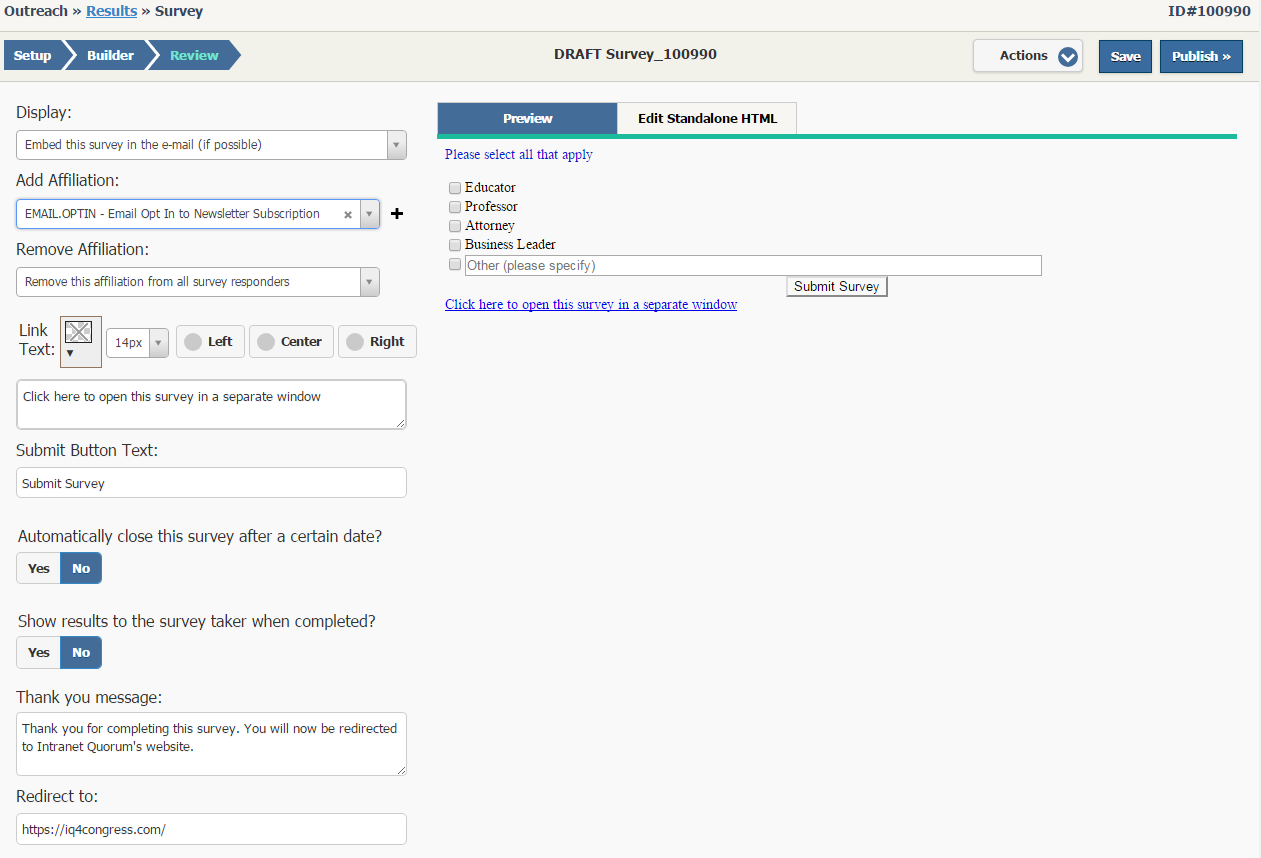
16.Add or Remove Affiliation Codes to/from the Contact record for all recipients who submit the survey.
17.The Link Text displays the URL (i.e. Click here to open this survey in a separate window) that will open the survey in a new window. You can select a color, font size and placement (Left, Center or Right) of the URL.
18.The Submit Button text defaults to "Submit" unless you enter an alternate text such as "Submit Survey". You may also change the color of the button.
19.Automatically close survey defaults to No. If Yes is selected, then you can set the closed date, enter a "Closed Survey" message text and/or redirect to a specified website.
20.If you would like all recipients to be able to see the results of the survey once they have submitted their answers, select the Yes button in the Show results to the survey taker when completed? button. This will display a graph with the number and percent of total for each answer. NOTE: If you submit a test Survey and do not want the test results to be included, then select "Clear Instapoll" in-row action or under the Actions Menu of the published survey.
21.Use the Thank you message field if you would like to display a message after the recipient submits the Survey.
22.Enter a URL in the Redirect to: field if the recipient should be redirected to another website.
23.Select the Publish button.
24.IQ displays the Publish Survey to IQ Connect dialog with three options, "Publish this survey for use in outgoing email" is checked by default. If you would like IQ to open the eNewsletter wizzard with the Survey, then check "Start an outreach mailing based on the content of this survey". Select "Publish this survey as a NEW standalone web form" if you would like IQ to link the Survey to an IQ Web Form.
.png)
25.Select the Publish button in the dialog. Your survey is published and ready to be included in web pages, emails, and eNewsletters. Note: If IQ encounters any errors while trying to publish the Survey, the dialog will remain open with the list of errors.
Copyright © 2020 Leidos Digital Solutions, Inc (DSI)